Criar um blog pessoal pode parecer desafiador, ainda mais se, como eu, você chegou a pensar em construir algo do zero. Criar ferramentas do zero realmente é muito legal e desafiador, mas, a verdade é que, se o seu objetivo principal é compartilhar conteúdo, algo pronto deve servir.
Como tenho utilizado o Obisidian para escrever e organizar todas as minhas notas e documentações que, naturalmente, estão armazenadas em arquivos Markdown, decidi utilizar o Quartz.
Trata-se de um gerador de site estático compatível com o Obsidian. A ferramenta é cheia de features como graph view, Full-text search, Popover previews, Mermaid e muitas outras.
A configuração é muito simples. Abaixo te mostro como a minha foi feita. Não necessariamente é o melhor jeito, então, fique livre para utilizar e modificar como quiser.
Configuração
Requerimentos: Node.js e NPM.
Ao contrário da maioria dos SSGs, o Quartz não oferece uma CLI de bootstrapping. De acordo com a filosofia do Quartz, você deve clonar e utilizar o repositório como quiser, o que, naturalmente, te permitirá fazer qualquer tipo de personalização. Na aba de Get Started da documentação oficial esse setup é melhor detalhado.
Como eu não pretendo fazer nenhum tipo de configuração mais avançada, além de não querer versionar todos esses arquivos, vou fazer um pouco diferente. A ideia é fazer com que o Quartz sirva somente como um pacote, onde vou apenas sobrescrever os arquivos que eu preciso para configuração mínima. Toda essa configuração será escrita em um Makefile
Bom, vamos começar criando o diretório do projeto:
mkdir blog && cd $_Tip
$_recebe o último argumento do comando anterior.
Agora, vamos criar o Makefile:
touch MakefileNesse arquivo, estarão as instruções necessárias para preparar os diretórios, baixar o código fonte do Quartz, sobrescrever os arquivos necessários e instalar as dependências. O conteúdo ficou assim:
all: clean prepare get-quartz link-quartz-overrides install-quartz-dependencies

prepare:
	@mkdir quartz

get-quartz: quartz
	@cd quartz; \
    curl -L https://github.com/jackyzha0/quartz/archive/refs/tags/v4.5.1.tar.gz | tar --strip-components=1 -xzf -

link-quartz-overrides: content quartz.config.ts quartz.layout.ts static/icon.png static/og-image.png
	@cd quartz; \
	rm -rf content quartz.config.ts quartz.layout.ts quartz/static/icon.png quartz/static/og-image.png; \
	ln -s ../content; \
	ln -s ../quartz.config.ts; \
	ln -s ../quartz.layout.ts; \
	cp ../static/icon.png quartz/static/; \
	cp ../static/og-image.png quartz/static/

install-quartz-dependencies: quartz
	@cd quartz; \
	npm i

clean:
	@rm -rf quartz
Para não deixar maçante, não me aprofundarei em cada comando. Mas aqui está uma breve descrição de cada target:
| Target | Descrição |
|---|---|
| all | Responsável por chamar todos os outros targets na sequência |
| prepare | Criará os diretórios que são requerimento dos outros targets |
| get-quartz | Baixa e extrai o código fonte do Quartz |
| link-quartz-overrides | Mapeia os arquivos e diretórios da root com os do Quartz |
| install-quartz-dependencies | Instala as dependências do Quartz |
| clean | Limpa os diretórios criados durante a execução do Makefile |
Tip
Se você não especificar nenhum target na hora de executar o Makefile (comando
make), o primeiro target será sempre executado. Você pode se aproveitar disso e criar um target que chama todos os outros. Por isso, é bem comum encontrar o primeiro target nomeado comoall.
Tip
A syntax de um target do Makefile é mais ou menos assim:
target: requirements
	body
No
requirements, você pode por todos os arquivos e/ou diretórios necessários para a execução desse target que, na ausência de algum, a execução falhará.
Tip
O
-Ldo curl vai redirecionar o binário para otar, assim eu recebo o arquivo baixado pelostdout.
Você pode ter reparado que no target link-quartz-overrides, a gente faz alguns links simbólicos de alguns arquivos e copia outros. Entre eles, estão o diretório de conteúdo, arquivos de configuração do Quartz e arquivos estáticos de imagem, como favicon e og-image.
Esses arquivos são necessários para a execução do Makefile, bem como para o correto funcionamento do Quartz. Portanto, vamos criá-los. Para facilitar, vamos utilizar os arquivos do próprio repositório do Quartz como base. Pra isso, execute os comandos a seguir linha por linha:
curl -O https://raw.githubusercontent.com/jackyzha0/quartz/refs/tags/v4.5.1/quartz.layout.ts
curl -O https://raw.githubusercontent.com/jackyzha0/quartz/refs/tags/v4.5.1/quartz.config.ts

mkdir static
curl -o static/icon.png https://raw.githubusercontent.com/jackyzha0/quartz/refs/heads/v4/quartz/static/icon.png
curl -o static/og-image.png https://raw.githubusercontent.com/jackyzha0/quartz/refs/heads/v4/quartz/static/og-image.png

mkdir content
echo ":)" > content/index.md
Hint
Se como eu, você estiver utilizando o Obsidian, linkar o diretório
contentcom o seu vault pode ser uma boa. Dessa forma, você consegue sincronizar os Markdowns do seu blog com seus outros dispositivos por meio de alguma cloud.No meu caso, meu vault é sincronizado pelo iCloud, então, criei um link local usando o bindfs. Depois, você pode fazer o link permanente usando o
launchctlousystemctl.
Nesse momento, temos todos os arquivos necessários do setup básico, mas, como os arquivos quartz.layout.ts e quartz.config.ts não estão mais no diretório original, vamos precisar atualizar os imports:
+ import { QuartzConfig } from "./quartz/quartz/cfg"
+ import * as Plugin from "./quartz/quartz/plugins"
- import { QuartzConfig } from "./quartz/cfg"
- import * as Plugin from "./quartz/plugins"+ import { PageLayout, SharedLayout } from "./quartz/quartz/cfg"
+ import * as Component from "./quartz/quartz/components"
- import { PageLayout, SharedLayout } from "./quartz/cfg"
- import * as Component from "./quartz/components"Com todos arquivos criados e o Makefile pronto, podemos executar o make:
makeSe tudo ocorrer bem, ao executar um ls, você terá uma estrutura de pastas como essa:
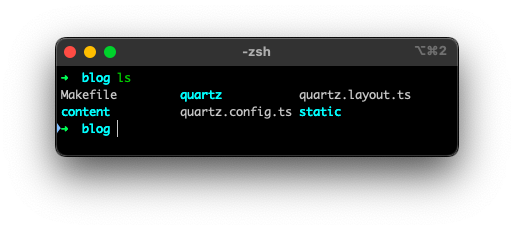
Além dos arquivos que criamos, temos todo o código fonte do Quartz dentro do diretório quartz. Se você pretende versionar isso em um git, por exemplo, o diretório quartz pode ser ignorado:
quartzNesse ponto, temos todos os arquivos para rodar o projeto. No site oficial, na aba de arquitetura, temos a indicação de uma CLI interna com um comando que sobe um server local. Para facilitar essa execução, vamos criar um script:
#!/bin/bash

if [[ ! -d quartz ]]; then
    echo "quartz dir not found, try to run \"make\" command"
    exit 1
fi

cd quartz && ./quartz/bootstrap-cli.mjs build --serve --port 3000
Note
O
cd quartzé necessário, pois, nesse caso, o workdir precisa ser o diretório do Quartz.
Não esqueça de setar permissão de execução para o script:
chmod +x ./scripts/dev.shEntão, se executarmos:
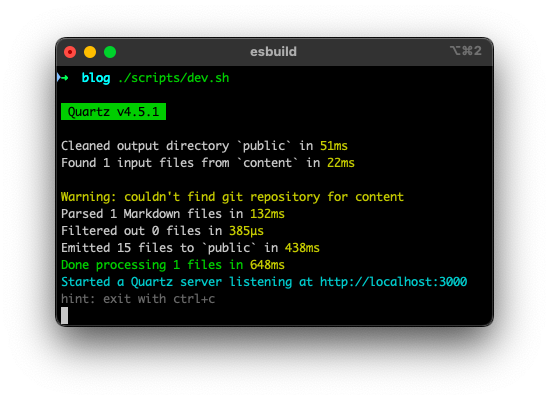
./scripts/dev.shO servidor local deve estar rodando na porta 3000:
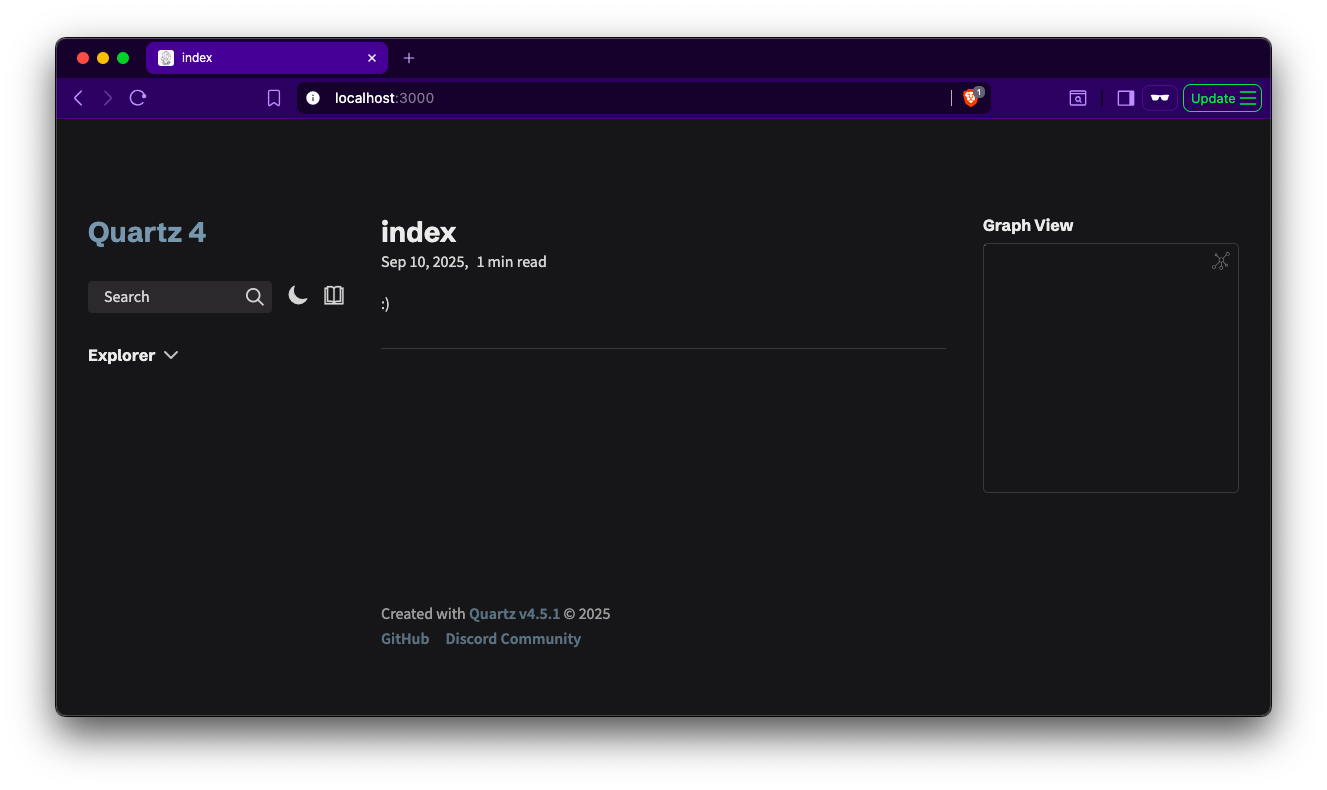
E, se acessarmos o http://localhost:3000 no browser, teremos algo como:
Com isso, temos tudo funcionando localmente (com hot reload e tudo). Partindo dos arquivos de configuração, você consegue personalizar tudo do seu jeito. Para entender melhor sobre esses arquivos, consulte a documentação de configuração e teste bastante localmente.
E, para finalizar, caso queira publicar o seu trabalho, pode ser legal criar um script de build:
#!/bin/bash

if [[ ! -d quartz ]]; then
    echo "quartz dir not found, try to run \"make\" command"
    exit 1
fi

cd quartz && ./quartz/bootstrap-cli.mjs build --output ../dist
chmod +x ./scripts/build.shEsse script vai gerar um diretório dist na raiz do projeto. Nesse diretório, estão todos os arquivos que você precisa para a publicação.
O código fonte desse passo a passo está nesse repositório. Caso queira consultar alguma aplicação do mundo real, o meu blog foi construído nessa mesma base.
![]() en-US version
en-US version
How I built My Blog With Quartz
Creating a personal blog may seem challenging—especially if, like me, you once considered building everything from scratch. Building tools from scratch is really cool and challenging, but the truth is that if your main goal is to share content, a ready-made solution will do the job just fine.
Since I’ve been using Obsidian to write and organize all my notes and documentation—which are naturally stored as Markdown files—I decided to use Quartz.
It’s a static site generator compatible with Obsidian. The tool is packed with features such as graph view, full-text search, popover previews, Mermaid support, and many others.
The setup is very simple. Below, I’ll show you how mine was done. It’s not necessarily the best approach, so feel free to use it and modify it however you like.
Setup
Requirements: Node.js and NPM.
Unlike most SSGs, Quartz does not offer a bootstrapping CLI. According to the Quartz philosophy, you should clone and use the repository however you want, which naturally allows for any kind of customization. In the Get Started section of the official documentation, this setup is explained in more detail.
Since I don’t plan to do any advanced configuration—and I also don’t want to version all of those files—I’ll do things a bit differently. The idea is to use Quartz only as a package, where I’ll overwrite just the files I need for minimal configuration. All of this setup will be written in a Makefile.
Alright, let’s start by creating the project directory:
mkdir blog && cd $_Tip
$_holds the last argument of the previous command.
Now, let’s create the Makefile:
touch MakefileThis file will contain the instructions required to prepare the directories, download the Quartz source code, overwrite the necessary files, and install dependencies. The final content looks like this:
all: clean prepare get-quartz link-quartz-overrides install-quartz-dependencies

prepare:
	@mkdir quartz

get-quartz: quartz
	@cd quartz; \
    curl -L https://github.com/jackyzha0/quartz/archive/refs/tags/v4.5.1.tar.gz | tar --strip-components=1 -xzf -

link-quartz-overrides: content quartz.config.ts quartz.layout.ts static/icon.png static/og-image.png
	@cd quartz; \
	rm -rf content quartz.config.ts quartz.layout.ts quartz/static/icon.png quartz/static/og-image.png; \
	ln -s ../content; \
	ln -s ../quartz.config.ts; \
	ln -s ../quartz.layout.ts; \
	cp ../static/icon.png quartz/static/; \
	cp ../static/og-image.png quartz/static/

install-quartz-dependencies: quartz
	@cd quartz; \
	npm i

clean:
	@rm -rf quartz
To keep things from getting tedious, I won’t go deep into each command. But here’s a brief description of each target:
| Target | Description |
|---|---|
| all | Responsible for calling all other targets in sequence |
| prepare | Creates the directories required by the other targets |
| get-quartz | Downloads and extracts the Quartz source code |
| link-quartz-overrides | Maps files and directories from the root to Quartz’s structure |
| install-quartz-dependencies | Installs Quartz dependencies |
| clean | Cleans up directories created during Makefile execution |
Tip
If you don’t specify any target when running the Makefile (the
makecommand), the first target will always be executed. You can take advantage of this and create a target that calls all others. That’s why it’s very common to see the first target namedall.
Tip
The syntax of a Makefile target looks roughly like this:
target: requirements
	body
In
requirements, you can list all files and/or directories needed for that target to run. If any are missing, execution will fail.
Tip
The
-Lflag incurlredirects the binary output totar, so I receive the downloaded file viastdout.
You may have noticed that in the link-quartz-overrides target, we create some symbolic links for certain files and copy others. Among them are the content directory, Quartz configuration files, and static image files such as the favicon and og-image.
These files are required both for the Makefile to run and for Quartz to function correctly. So let’s create them. To make things easier, we’ll use files from the Quartz repository itself as a base. To do that, run the following commands line by line:
curl -O https://raw.githubusercontent.com/jackyzha0/quartz/refs/tags/v4.5.1/quartz.layout.ts
curl -O https://raw.githubusercontent.com/jackyzha0/quartz/refs/tags/v4.5.1/quartz.config.ts

mkdir static
curl -o static/icon.png https://raw.githubusercontent.com/jackyzha0/quartz/refs/heads/v4/quartz/static/icon.png
curl -o static/og-image.png https://raw.githubusercontent.com/jackyzha0/quartz/refs/heads/v4/quartz/static/og-image.png

mkdir content
echo ":)" > content/index.md
Hint
If, like me, you’re using Obsidian, linking the
contentdirectory to your vault can be a good idea. That way, you can sync your blog’s Markdown files across devices using a cloud service.In my case, my vault is synced via iCloud, so I created a local link using bindfs. Later, you can make the link permanent using
launchctlorsystemctl.
At this point, we have all the files required for the basic setup. However, since the quartz.layout.ts and quartz.config.ts files are no longer in their original directory, we need to update the imports:
+ import { QuartzConfig } from "./quartz/quartz/cfg"
+ import * as Plugin from "./quartz/quartz/plugins"
- import { QuartzConfig } from "./quartz/cfg"
- import * as Plugin from "./quartz/plugins"+ import { PageLayout, SharedLayout } from "./quartz/quartz/cfg"
+ import * as Component from "./quartz/quartz/components"
- import { PageLayout, SharedLayout } from "./quartz/cfg"
- import * as Component from "./quartz/components"With all files created and the Makefile ready, we can run:
makeIf everything goes well, running ls should give you a folder structure like this:
In addition to the files we created, the entire Quartz source code will be inside the quartz directory. If you plan to version this in git, for example, the quartz directory can be ignored:
quartzAt this point, we have everything needed to run the project. On the official site, in the architecture section, there’s a reference to an internal CLI with a command that starts a local server. To make this easier, let’s create a script:
#!/bin/bash

if [[ ! -d quartz ]]; then
    echo "quartz dir not found, try to run \"make\" command"
    exit 1
fi

cd quartz && ./quartz/bootstrap-cli.mjs build --serve --port 3000
Note
The
cd quartzis required because, in this case, the working directory must be the Quartz directory.
Don’t forget to set execution permissions for the script:
chmod +x ./scripts/dev.shThen, if we run:
./scripts/dev.shThe local server should be running on port 3000:
And if we access http://localhost:3000 in the browser, we’ll see something like:
With that, everything is working locally (with hot reload and all). Starting from the configuration files, you can customize everything your way. To better understand these files, check the configuration documentation and experiment a lot locally.
Finally, if you want to publish your work, it might be useful to create a build script:
#!/bin/bash

if [[ ! -d quartz ]]; then
    echo "quartz dir not found, try to run \"make\" command"
    exit 1
fi

cd quartz && ./quartz/bootstrap-cli.mjs build --output ../dist
chmod +x ./scripts/build.shThis script will generate a dist directory at the root of the project. Inside it, you’ll find all the files you need for deployment.
The source code for this step-by-step guide is available in this repository. If you want to check out a real-world application, my blog was built using this same setup.